
Mini-Split AC Installation Guide
Installing a mini-split air conditioner is a highly specialized task that requires expertise, skill, and knowledge to ensure it is done correctly and efficiently. The job must be done with great care and precision, so in order to assist you with successfully installing your mini-split air conditioning system, we have compiled this comprehensive guide for your reference.
Understanding the Basics
Choosing the right mini-split air conditioning system for your particular needs is an important first step. There are several different types of systems that you should consider, including central air conditioners, window units, and mini splits. Mini splits are generally more efficient, allowing you to customize their capacity, positioning, and energy savings. Make sure to consult with a professional before making your decision, as there are important differences between the various types of air conditioners.
Checklist
Once you have chosen a model, you need to make sure that you have everything you will need to complete the installation. This includes a professional-grade toolkit that includes a drill, screwdriver, level, and appropriate fasteners. Additionally, you will need a 3-inch hole saw, drill bit, and sealant tape, as well as a condensate drain line.
Installation
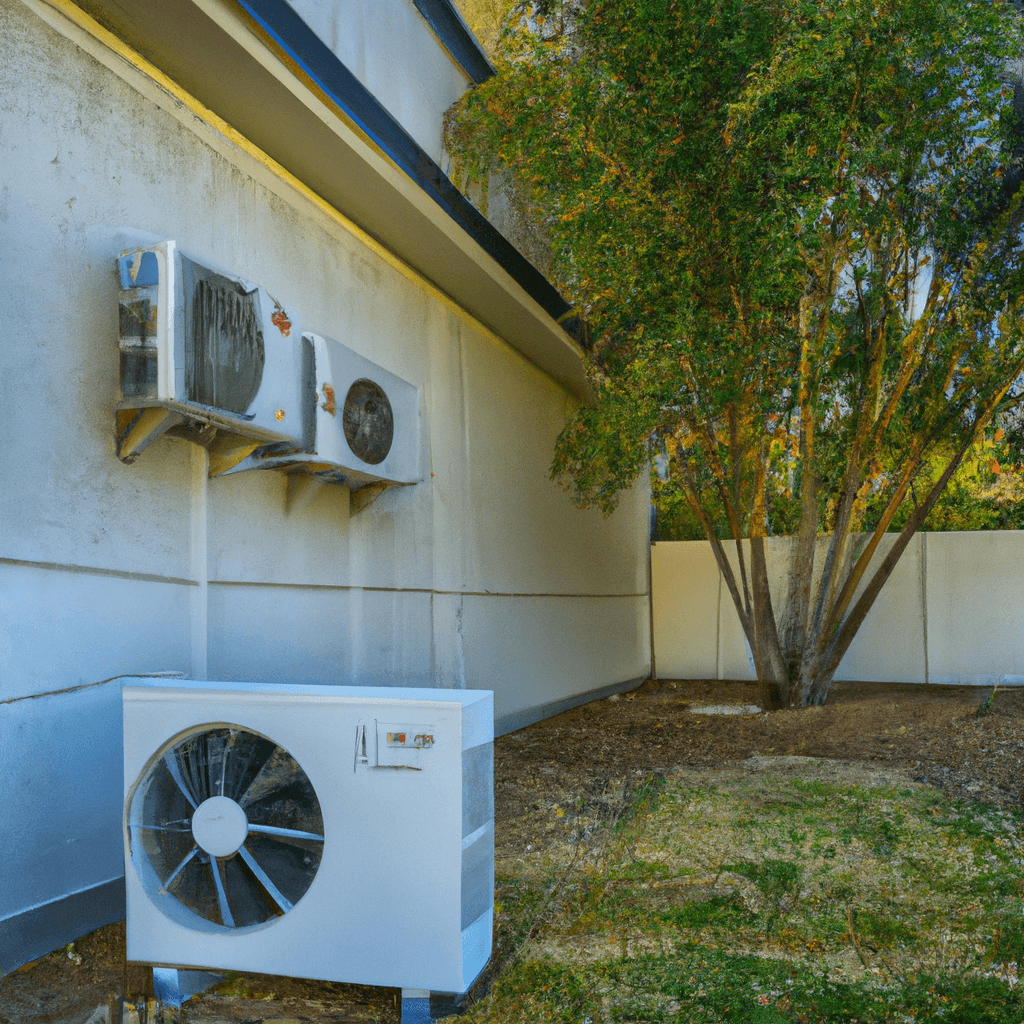
The mini split installation process is fairly straightforward, though you should always consult a professional before attempting any type of installation. Your first step is to locate the interior and exterior units; they should be placed in locations that are free from noise and other disruptions. Make sure each unit is level and, if need be, using shims to make adjustments.
Once you have determined the most appropriate locations for each unit, you can begin the process of mounting the exterior unit to the wall. Make sure to use professional-grade fasteners and fasten them securely to the wall. Once the exterior unit is mounted, it is time to make the connections.
Using the pre-drilled holes, run the electrical wiring between the interior and exterior units. If you need to run new lines, make sure to do so in accordance with local codes and electrician protocols. Make sure to securely seal any wiring connections, and be sure to also take into account any ventilation requirements as specified by the manufacturer.
Connections
In addition to electrical wiring, you must also establish the refrigerant lines between the interior and exterior units. This will involve connecting the lines to the appropriate connections, and then running the line between the two units. The line should be sealed along its length with professional-grade tape so as to ensure a tight and secure connection.
The last step in the mini-split installation process is to run the condensate drain line, which will collect and carry away any condensation that accumulates. This is typically routed to an exterior drain or the sewer line and should be secured along its length with appropriate fasteners.
Finishing Touches
After the drain line is connected and sealed, you can finish the installation by turning on the power and testing the system before you use it. Once all connections have been properly secured and tested, you can close the interior wall access panel and turn on the mini-split air conditioner.
Conclusion
Installing a mini-split air conditioning system is a complex and intricate job that requires expertise and precision. This guide provides an overview of the installation process, from understanding the basics to making connections and performing the finishing touches. Make sure you consult with a professional if you have any questions or concerns about the installation process. Additionally, for any appliance repair problems, you can always rely on Local Reliable Appliance Repair at (866) 311-8590.


Mini Split AC Installation: Tips for a Smooth Installation
The installation and repair of a mini split AC requires a great deal of technical knowledge and precision. If not handled properly, it can lead to various issues and even complete system failure. To ensure a smooth and stress-free installation, consider the following manufacturer recommendations, local appliance companies’ advice, and HVAC technicians’ insights.
Manufacturer Recommendations
The most important step before installing a mini split AC is to read the manufacturer’s instructions, as this can help avoid costly complications. Additionally:
- Make sure to look into the specific requirements of the system, such as power supply and wiring, in order to ensure that it is compatible with the existing infrastructure.
- Inspect the unit, filter, and fan for any potential intact or sparks as these may indicate any underlying problems or issues.
- Allow for adequate ventilation, as excessive heat can lead to system overload and failure.
- Ensure all components are wired correctly and securely, as incorrect wiring can damage the mini split AC and may even be a safety hazard.
Local Appliance Company Advice
When selecting an appliance company for the installation of a mini split AC, be sure to research their services and customer reviews. Additionally, consider the following tips to make sure the process goes smoothly:
- Schedule the installation with a technician that has the right experience and expertise.
- Request a quote before signing any contracts.
- Ask about any warranties, guarantees, and after-sales services.
- Make sure to confirm that all the necessary components and tools are included in the installation package.
HVAC Technician’s Advice
When hiring an HVAC technician to install the mini split AC, consider their experience, qualifications, and customer feedback. Additionally, ask the technician to provide the following information:
- Evidence of accreditation and licensing
- Disclose any prior experience they have in the installation of mini split ACs.
- Offer a full checklist of the necessary components and tools.
- Check the available power supply and provide a detailed list of any potential changes that need to be made in order for the system to function properly.
- Ensure the unit is functioning efficiently and provide basic maintenance tips to keep it running smoothly for longer.
Conclusion
By following the above manufacturer recommendations, local appliance companies’ advice, and HVAC technician insights, it’s possible to make sure the process of installing a mini split AC runs smoothly. Utilizing the right knowledge and expertise can not only save money and time but also help ensure the system runs efficiently and safely.
Average Cost of Installing a Mini Split AC
Planning to install a mini split air conditioning (AC) system in your home or workplace? You’ll need a reliable contractor and an estimated budget to complete the task. Knowing the average repair costs in California can help you decide what to expect.
Here, we provide a comprehensive overview of the cost of mini split AC installation. We also list possible materials and offer professional advice from Local Reliable Air Conditioning & Heating (866-311-8590). Read on for a detailed breakdown of the associated fees.
Generally, the average cost of mini split AC installation in California is around $3,000. This may include any additional materials, such as copper tubing and wiring. The price may change with size, complexity of the installation, and the climate in the area. Before starting the project, always research local prices and services.
When picking a contractor, it’s best to select one who is professionally certified and licensed. This ensures that the job is done according to the required standards. Local Reliable Air Conditioning & Heating is one of the most trustworthy and reliable companies in California.
Materials Needed:
- Copper Piping – $0.20-$0.40 per foot
- Wire or Refrigerant Tubing – $0.4 per foot
- Wall Brackets – $50+
- Duct Sleeves – $15+
- Electrical Connectors – $20+
- Wall Registers – $15-$20
To get a better understanding of repair costs, you may need to explain details about the task. You can expect the installation contractor to ask about the ceiling height, how many outlets are needed, and the required voltage. Additional components may need to be supplied, which can add to the cost.
For a more precise estimate, consider consulting a professional contractor. Local Reliable Air Conditioning & Heating can provide quick and reliable services. Click (866-311-8590) to get in touch with them and schedule a meeting.
To summarize, the average cost of installing a mini split AC in California is approximately $3,000. However, this may vary according to the size and complexity of the task. Make sure you select a licensed contractor and prepare the necessary materials before starting the project. Don’t hesitate to contact Local Reliable Air Conditioning & Heating if you need expert services and advice.
Refresh Your Home with Mini Split AC Installation
Whether it’s time to beat the California heat or you’re looking to improve ventilation within your home, reliable installation and maintenance of a mini split AC is essential. That’s why many Californian’s count on Reliable Air Conditioning & Heating for all their installation needs.
Reliable is a family-owned, local California vendor round-the-clock to tend to the air conditioning needs of their customers. All of the technicians have at least five years of field experience and complete each job with the same level of respect.
Not only are the prices fair and affordable but you’ll get reliable same-day repairs and installations on all types of mini split AC systems. Thanks to their high-end safety certifications, you can trust its services to return the best possible condition of your air conditioning unit faster.
And best of all, the firm offers a 90-day guarantee on all repairs and installations. With Reliable Air Conditioning & Heating, you’ll always receive the best possible service. Learn more about reliable and their mini split AC installation services today and refresh your home faster!
FAQ About Mini Split AC Installation Guide
What Is a Mini Split AC System?
A mini split AC system is an all-in-one heating and cooling appliance system that is used to increase the comfort of people in a variety of indoor spaces. It consists of an outdoor unit, an indoor air handler, and a connection system that connects the two components.
What Are the Advantages of Installing a Mini Split System?
A mini split system is known for its energy efficiency, flexibility in installation, cost savings, and ease of use. Installation is straightforward and requires minimal disruption to the home. Additionally, this system can be used to control the temperature of specific individual rooms instead of the entire house, which can further help with energy savings.
How Is a Mini Split System Installed?
Mini Split AC systems typically require a wall or ceiling unit to be mounted. The indoor unit is then connected with a series of insulated copper tubes, known as the refrigerant line, to the outdoor unit. Once all of the necessary wiring and connections have been established, the system is ready to be used.
What Are the Basic Steps Involved in Installing a Mini Split AC System?
Install a wall or ceiling mount for the indoor unit. Install the outdoor unit in a well-ventilated area, away from any combustibles. Connect the indoor and outdoor units with the refrigerant line. Set up and secure the indoor unit. Connect the electrical wiring and make sure the system is properly charged. Ensure that the system is operating correctly.
If you have any questions about the installation of a mini split AC system or need more detailed assistance, contact your Local Reliable Appliance Repair at (866) 311-8590 for more information.